Imagine a driveway that’s not just a path to your garage but a statement piece. A patio or pool deck that’s more than a hangout spot, but a work of art. That’s the magic of a pebble concrete overlay — a simple yet transformative technique that can turn your outdoor spaces from standard to standout.
In this guide, we’ll dive into the world of pebble concrete overlays, exploring their benefits, installation process, design choices, and maintenance tips. Ready to embark on a revamping journey? Let’s dive in!
Understanding Pebble Concrete Overlay
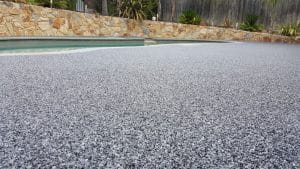
Concrete resurfacing with pebble stone or concrete can offer a major face lift to existing patio and driveway surfaces. With the help of materials such as stone paving, epoxy, or specialised products like Sundek’s do-it-yourself kits, you can create porous pavement and give these areas new life by applying an overlay featuring colourful stones. For those who’d rather leave it in professional hands, DCR Pro Concrete Resurfacing offers their own unique mixtures for delivering decorative finishes that include pebble stone pavements.
In essence, this is an opportunity to upgrade your outdated and discoloured concrete surface into something special using one of the many techniques available (such as different types of overlapping layers) allowing homeowners to enjoy a completely renewed area!
Preparing Your Existing Surface
To begin the transformation process of your existing surface, there are three important steps to follow: cleaning and power washing, repairing any cracks or damage present on the surface, and lastly levelling out and smoothing porous paving surfaces for optimal pebble concrete overlay installation. All these procedures are essential in order to achieve a long lasting durable result after installing said concrete overlay.
Cleaning and Power Washing
It is very important to use the proper tools and solutions when beginning preparation for a concrete or tile overlay. A pressure washer, outdoor cleaner, scrubber dryer, as well as vacuum or dust mop are all recommended for optimum results.
First and foremost one must begin with cleaning the surface then power washing it off in order to make sure that loose debris like dirt and old concrete patching material have been completely removed so there is an even finish once applying the new concrete layer over top. This process includes:
Soaking – applying surface-safe cleaners and allowing them time needed to break down stains/dirt.
Pressure washing – using sweeping motions. Rinse thoroughly after this step in order not to be left with any residue on surfaces beneath finally giving you smooth end product ready to bond perfectly with your fresh overlay.
Extra caution should always be taken while using high powered equipment since too much force can cause further damage detrimental to the successful application of the overlay. This can then risk durability and undesirably impacting the strength of future structure.
Repairing Cracks and Damage
Before moving onto the pebble concrete overlay, it is imperative to repair any cracks or damages in existing surfaces. These fissures are usually a result of shrinkage when drying and hardening, cracking from stamping process pressure, as well as cement-water mixture discrepancies. To fix these issues appropriately, you may want to use rigid sealers such as epoxy fillers or mortar material products like ARDEX restoreKoat by Concrete Craft, etc.
A step-by-step procedure includes: cleaning the area with wire brushes clearing debris. Filling up a crack completely with an appropriate semi-rigid product such as polyurethane, creates new control joints where required, depending on size of fracture. Dampen the surface prior to applying mending materials and make sure you match exact shades according to manufacturer’s regulations for consistency.
Lastly, let curing take place fully before going any further.
Levelling and Smoothing
For a smooth and even base of pebble concrete overlay, the next step is levelling and smoothing. This process requires the existing pebble concrete resurfacing surface be levelled with a screed board, followed by the application of primer. This is done for adhesion.
It usually takes just a few hours to complete this job. Being particular about these processes are important as certain mistakes such as not properly levelling surfaces, incorrect initial installation, and hurried grinding might lead to improper bedding sand installation. If these happen, it is often necessary to restart the entire process.
Once all of these prep steps have taken place, you can begin the installation!
The Installation Process: A Step-by-Step Guide
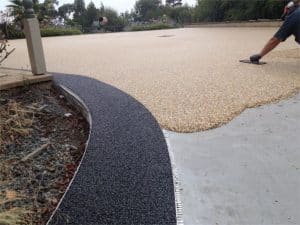
Once the surface has been prepped, you can begin the pebble crete overlay installation. This includes combining epoxy with pebbles, and layering it thick yet evenly on the top layer of your ready-to-go base. Then wait for everything to dry so that a firm overlay is created.
The whole process consists of mixing these two components together and then applying them onto the primed area until cured.
Mixing Epoxy and Pebbles
The epoxy installation process begins with combining the pebbles and adhesive. You need to take into account ratios, instructions from manufacturers, as well as temperature during this procedure. First start with small batches for mixing. The prime mixture should cover 200 square feet of tiles per gallon of solution. Once it is mixed properly, you can pour it over the stones while stirring till they are totally encapsulated in the solution.
It is necessary not only to accurately measure materials but also maintain safety guidelines such as wearing protective gear like gloves or glasses, ensuring there is adequate ventilation and avoiding skin contact when dealing with resin-based products. Temperature may be a factor that has an effect on gelation period, which is why following precise details listed by the brands used should always be taken into consideration.
Applying the Mixture
Once everything is ready, it’s time to create the new surface. This includes several steps:
- Apply an epoxy primer, which needs drying
- Mixing a solution according to manufacturer’s instructions in order to spread over clear pebbles placed inside a bucket
- Ensure all components are properly combined with each other, using a trowel to evenly spread them onto the desired area – corners, edges, etc., creating durable texture effect
- Let the cured mix stand and dry completely, according to the manufacturing guidelines.
It’s important to allow for a sufficient amount of time to applying the mixture step. Taking the time to do the right look of this correctly will result a long lasting decorative feature.
Curing Time and Conditions
When applying a pebble overlay, the curing process begins immediately. While 24 hours after sealant has been put on, this is usually the period of time needed for it to completely cure. Please remember this time could vary as it can be affected by temperature and humidity.
To get optimal results from your concrete surface, make sure you maintain the temperature and humidity during its maturation stage whenever possible. If there is a change in either of these, it could lead to weak adhesion strength and/or crevices appearing. Allowing sufficient dry-time should ensure your new pebble overlay will perform at its best over an extended lifespan.
Design Choices for Your Pebble Overlay
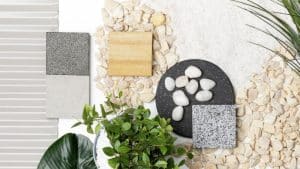
The covered installation process now provides an avenue to express your creativity. Pebble concrete overlays allow for limitless design options, such as combining colours and textures, making custom patterns with borders, or adding decorative elements like stencils or stamps. Combining pebbles of varying sizes, colours, and shapes can also be done in conjunction with other materials such as glass or shells. Imagination is the only limit when it comes to creating unique designs out of these available resources.
Selecting Colours and Textures
The more porous surface quality of marble with a pebble concrete overlay provides an attractive look and feel to your outdoor area, while also acting as a way of concealing debris. This type of surface can be personalised for any design plan you have in mind, making it the perfect option when looking for something distinctive yet practical.
With various colours and textures available – from Euro-stone bubble texture to dark blue granite or red lava rock, there are plenty options out there that will satisfy any taste preference imaginable. Trowel downed wet bubbles stencil patterns may even provide added visual appeal. Overall, this type of overlay is extremely versatile, adding both beauty and functionality alike to the flooring any given space without compromising aesthetic elements like natural stone appearance either.
Custom Patterns and Borders
Creating one-of-a-kind custom patterns and borders with pebble overlays is a great way to really add texture and your own personal touch. Popular designs include flagstone, cobblestone, rock overlay, and wood patterns – all of which can be achieved by hand cutting or stamping techniques. You can also use tape to make them look like natural materials such as the stone paving and brick for a bold finish.
For additional stylish enhancement, use exposed aggregate concrete at the edges. This will not only enhance outdoor spaces, but also create either classic stone pathways or modern patios depending on the pattern you choose.
Maintenance and Upkeep of Pebble Surfaces
Regular Cleaning Practices
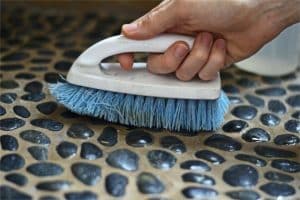
The surface of a pebble concrete overlay needs to be regularly cared for in order to maintain its good looks and longevity. For best results, it is recommended that you use brushes, pressure washers or even power cleaners instead of harsh chemicals when cleaning the area. Water-based cleaners which have an unaltered pH balance are ideal as they will not cause any damage while still cleaning effectively.
It should also be noted that taking care of your concrete overlay cannot just occur once, but must become part of regular upkeep routine if it is going to remain looking well maintained over time. This includes keeping the overlaid area free from dirt and other debris.
Resealing the Surface
In order to preserve the longevity and attractiveness of pebble concrete overlays, it is essential to reseal them periodically. The timeframe for doing this depends upon the amount of wear and exposure they receive from environmental conditions. Typically, the resealing process should occur every two to five years.
Resealing the surface consists in cleaning away any debris or damage from the surface before applying sealant as instructed by manufacturer guidelines. Resealing frequently helps ensure protection against damages, as well as enhance its appearance over time.
Comparing Pebble Overlays with Other Resurfacing Options
When considering your driveway resurfacing options, the advantages and visual appeal of pebble concrete overlays should not be overlooked. From paint or stains to textured coatings using aggregate materials such as asphalt or pavers, many affordable alternatives are available for homeowners looking to freshen up their surfaces without breaking the bank. Pebble overlay systems, combined with a sealant, can provide an easy-to-maintain finish at reduced costs when compared against conventional paving techniques like stamped concrete.
It is important that specific requirements are taken into account prior to choosing a desired method. Each option offers its own set of benefits and potential drawbacks. Noise insulation levels may vary alongside weather protection qualities, depending upon what kind of solution you choose in order to get maximum durability out of your investment over time.
Addressing Common Concerns with Pebble Overlays
It is natural to have questions when tackling a home improvement task such as pebble concrete overlays. Some frequent questions are the difficulty of installation, UV deterioration, possible chips or fractures in the material, erosion caused by water seepage and unlevelled stone paving stones from sinking. Other worries include staining issues and upkeep requirements for lasting results.
Fortunately, it has been proven that with proper setup and maintenance techniques, these cement-based surfaces can continue functioning reliably, even in unpleasant conditions like saltwater spray or severe ultraviolet radiation over many years, if not decades.
Incorporating Pebble Overlays in Various Outdoor Spaces
Pebble overlays are a great addition to any outdoor space, bringing slip resistance and enhanced aesthetic appeal. Driveways, patios, pool decks and walkways can all benefit from this very resistant and versatile product. Those using it around pools must be aware that certain precautions need to be taken to ensure surfaces are free from contaminants or build up of water on decking structures beforehand.
All in all, there’s no doubt how including pebble paving overlays into driveways, sidewalks, pathways or patio environments will bring beauty and longevity through its low maintenance along with increased long lasting property value achieved by their installation.
Summary
We’ve provided essential information about pebble concrete overlays. From learning what they are and how to use them for resurfacing existing surfaces, going through the installation process, examining design choices, as well as understanding maintenance practices and addressing any issues. With such a sturdy yet attractive option available for your driveway or outdoor space makeover, why wait?
Ready to transform your outdoor spaces into a work of art? Don’t wait! Contact us at Project Concrete today. We’re experts in pebble concrete overlay installation, and we’re here to help you create a durable, beautiful, and unique space you’ll love. Get in touch now and let’s embark on this revamping journey together!
