Burnishing concrete surfaces is an excellent way to achieve a smooth, glossy finish that enhances both the durability and aesthetic appeal of concrete floors.
Whether for residential interiors, commercial spaces, or warehouses, a burnished concrete floor can provide a sleek and modern look. Here’s a comprehensive, step-by-step guide on how complete a burnished concrete floors effectively. alternatively you can also read our complete guide to burnished concrete floors.

Preparation
Achieving a smooth and level concrete slab is crucial for obtaining polished concrete floors with a high-gloss finish.
1. Pour and Cure the Concrete Slab
The first step in achieving a perfect burnished concrete finish is to pour the concrete slab correctly. Ensure the slab or finished floor is level and smooth during the pouring process. Once poured, allow the concrete to cure completely. Proper curing is essential for the strength and durability of the concrete. During the curing process, keep the concrete moist and avoid exposing it to extreme temperatures, which can cause cracks and weaken the structure.
2. Initial Trowelling
Before the concrete sets, use a power trowel to smooth the surface. This step helps to remove any footprints, marks, or imperfections, creating an even surface that is easier to work with during the burnishing process. Proper trowelling will lay the foundation for a flawless burnished finish. Make sure to operate the trowel in consistent, overlapping passes to any uneven floor and ensure an even surface.
3. Thorough Cleaning
Once the concrete has cured and been trowelled, the next step is thorough cleaning. Remove any debris, dust, or stains from the surface. This can be done using a combination of sweeping, vacuuming, and washing with a mild detergent. Ensuring a clean surface is crucial as any residue left behind can affect the final finish. Additionally, check for any oil stains or chemicals that might have seeped into the surface and address them before proceeding.
Also read – How to Clean Burnished Concrete Floors: The Ultimate Guide

Applying the Concrete Densifier
4. Choose the Right Densifier
A concrete densifier is essential to increase the strength and density of the concrete substrate before burnishing. Products like Lithi-Tek 4500 are excellent choices due to their lithium silicate-based chemistry, which penetrates the concrete and enhances its hardness. This step not only prepares the concrete for burnishing but also prolongs its lifespan by making it more resistant to wear and tear.
5. Apply the Densifier
Apply the concrete densifier evenly across the surface using a low-pressure sprayer. Allow the densifier to penetrate the concrete, which usually takes about 20 to 30 minutes. After application, any excess densifier should be removed to prevent residue build-up. The densifier will react with the concrete to create a harder, denser surface than polished concrete, which is ideal for burnishing. For best results, follow the manufacturer’s guidelines regarding application rates and drying times.

Burnishing Process
To further enhance the shine, durability, and toughness of burnished concrete floors, applying a chemical coating is a crucial step. This typically involves a wax-based product that, when used in conjunction with burnishers, is heated, melted, and buffed into the concrete’s surface. The chemical coating seeps into the small pores of the concrete, creating a protective layer that not only adds to the aesthetic appeal by providing a glossy finish but also increases the floor’s resistance to wear and tear.
6. Select the Appropriate Burnishing Pads
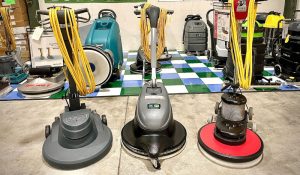
Choosing the right grit pad for your burnishing machine is crucial. For beginners, starting with a 1500- or 2000-grit pad is recommended. Higher grit counts will result in a glossier, smooth surface throughout. Ensure you have the right pads for the desired level of gloss and smoothness. It’s advisable to have a range of pads available, as you may need to adjust the grit level based on the condition of the concrete and the desired finish.
7. Burnish the Concrete Surface
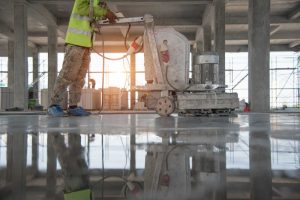
Using the burnishing machine, begin to burnish the surface. Start at one end of the floor and work systematically across the entire area. Move the polishing machine slowly and evenly to avoid over-burnishing any particular spot. This step is critical as uneven burnishing can lead to a patchy and unappealing finish. Make sure to overlap each pass slightly to ensure consistent coverage.
8. Multiple Passes
The number of passes you make with the burnishing machine can depend on your desired level of gloss. Typically, more passes will result in more polish and a higher sheen. Ensure each pass is consistent to maintain an even finish across the entire surface. Be patient and take your time with this step, as rushing can lead to an uneven appearance.
Final Steps and Tips
9. Inspect the Surface
After burnishing, inspect the surface for any inconsistencies or areas that may need additional attention. Address any spots or surfaces that appear less glossy or uneven by making additional passes with the burnishing machine. Pay close attention to the edges and corners, which can be tricky to reach with the machine.
10. Apply a Protective Sealer
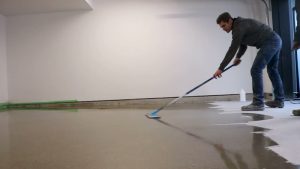
To protect the burnished concrete floor and enhance its durability, apply a clear protective sealer. This will also help maintain the glossy finish over time. Use a high-quality sealer and apply it evenly across the surface, following the manufacturer’s instructions. Consider using a penetrating sealer for commercial floors for added protection against stains and spills.
11. Regular Maintenance
Maintaining a burnished concrete floor is relatively easy. Regular sweeping and occasional mopping with a mild detergent will keep the burnished floor looking its best. Avoid using harsh chemicals or abrasive cleaning tools that can damage the surface. Periodically reapply the protective sealer to ensure long-term durability and shine.

Additional Tips for Success With Burnished Concrete Floors
Be mindful of the temperature and humidity during the burnishing process, as extreme conditions can affect the drying and curing times, leading to potential issues with the finish.
Always wear appropriate safety gear, such as goggles and dust masks, to protect yourself from dust and debris during the polishing process. If this is your first time burnishing concrete, practice on a small, inconspicuous area before tackling larger projects to get a feel for the machine and the process.
Conclusion
Burnishing concrete is an exceptional method for attaining a high-gloss, durable finish that elevates the appearance and functionality of concrete floors.
By following these comprehensive steps and utilizing the proper tools and products, you can achieve a professional-grade finish. Whether in residential, commercial, or industrial settings, a polished, expertly burnished concrete floor provides both visual appeal and practical advantages.
For further details and expert services, reach out to Project Concrete. Our team of burnished concrete Perth specialists is ready to assist you with all your concrete flooring needs, ensuring top-tier results every time.
